Your pool’s filtration system keeps water clear and safe, but a hidden leak can waste thousands of gallons, damage equipment, and lead to cloudy, chemically unbalanced water. This guide walks you through easy tests to spot where the leak is, step-by-step fixes for common problem areas like the pump, filter, unions, and valves, and clear advice on when it’s time to call a pro.
The filtration system is the heart of your pool. The pump pulls water through the skimmer, pushes it through the filter, and sends clean, chlorinated water back through the return lines. When any link in that chain develops a leak, you lose water and suction — which means weaker circulation, heavier chemical loads, and more strain on the motor. A slow drip today can become a cracked pump housing or a flooded equipment pad next month.
The good news: most pool filtration system leaks happen at predictable spots and can be diagnosed with a $10 bottle of dye and a Saturday afternoon. Below, you’ll learn how to isolate the leak, repair it safely, and decide whether a DIY fix is worth it or a pool professional is the smarter call.
6 Warning Signs the Leak Is in Your Filtration System
Before you grab a wrench, confirm the water loss is actually coming from the equipment side — not the pool shell or liner. Look for these symptoms:
- Rapid water loss beyond evaporation. A typical US pool loses about ¼ inch per day to evaporation. If you’re topping off more than 2 inches per week, suspect a pool filtration system leak.
- Wet ground, puddles, or soggy soil near the equipment pad, even when the grass elsewhere is dry.
- Air bubbles in the pump basket or gurgling sounds at the skimmer — a classic sign of a suction-side leak pulling air in.
- Low pressure on the filter gauge, a pump that loses prime overnight, or a pump that won’t prime at all.
- Cloudy water and chemical imbalance. Leaking systems can’t filter effectively, so chlorine demand climbs and water turns hazy.
- Leaks that only show up when the pump is running. Pressurized leaks point to the return side (filter to pool). Leaks that appear when the pump is off usually sit on the suction side (skimmer to pump).
The Bucket Test: Rule Out Evaporation
- Fill a 5-gallon bucket with pool water so the waterline inside matches the pool’s waterline outside.
- Place the bucket on the first or second pool step.
- Mark both water levels with tape or a Sharpie.
- Wait 24 hours — pump running normal schedule.
- If the pool water dropped noticeably more than the bucket water, you have a real leak.
Tip: If the pool level drops more with the pump on than off, the leak is on the pressurized return side. If it drops more with the pump off, it’s on the suction side (skimmer, main drain, or suction line).
This simple bucket test for pool leaks eliminates about half the false alarms homeowners chase every summer.
Safety First: Precautions and Tools
Working around water and 240-volt pool pumps requires respect. Before any inspection:
- Turn off the pump. Flip the breaker at the panel and, ideally, lock it out so no one flips it back on while your hands are in the plumbing.
- Unplug any auxiliary equipment (salt chlorine generators, UV systems, heaters).
- Wear gloves and safety glasses. Chlorinated water and PVC shavings are both irritants.
- Check local codes. Some US municipalities require a licensed electrician or plumber for any work touching 240V circuits or buried plumbing.
Tools and Supplies Checklist (click to expand)
| Category | Items |
|---|---|
| Hand tools | Phillips & flathead screwdrivers, channel-lock pliers, adjustable wrench |
| Plumbing | Teflon tape, PVC primer & cement, replacement unions, spare O-rings |
| Seals & lubricants | Silicone-based pool lube, pump shaft seal (model-specific) |
| Diagnostics | Leak detection dye, 5-gallon bucket, pressure test kit (optional) |
| PPE | Nitrile gloves, safety glasses, non-slip shoes |
Keep a small “pool repair kit” on the shelf — a spare pump lid O-ring, a union, and a tube of silicone lube pay for themselves the first time you use them.
How to Locate the Leak — Step-by-Step
Pool leak detection is a process of elimination. Work from the easiest check to the hardest, and don’t skip steps.
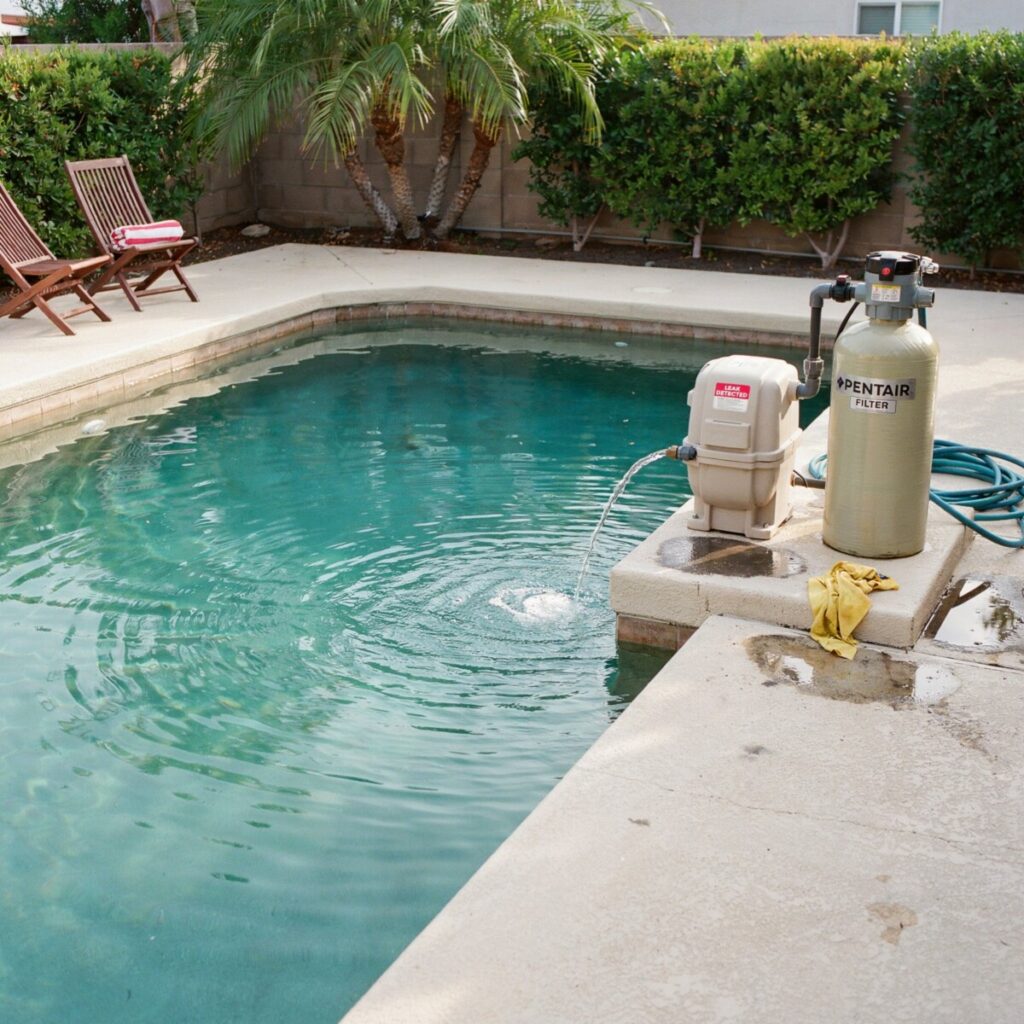
1. Visual Inspection of the Equipment Pad
Walk the pad slowly with a flashlight. Look for:
- Wet spots directly beneath the pump, filter, heater, or chlorinator.
- Mineral crusting or white scale on fittings — water that evaporates leaves calcium behind, marking the drip point.
- Rust streaks on the motor base.
- Drips from the multiport valve handle, waste line, or backwash port.
Real-world example: If you see water pooling under the pump only when the pump is running, that almost always points to a failed pump shaft seal. If the puddle appears when the pump is off, check the suction-side unions.
Suggested visual: Photo diptych — wet equipment pad “before” vs. dry “after” repair.
2. Isolate Each Component
Close valves one at a time to narrow the leak to a specific section:
- Skimmer valve closed → leak stops? Suction side, skimmer-to-pump.
- Return valve closed → leak stops? Pressurized return line.
- Main drain valve closed → repeat the test on that circuit.
3. Use Leak Detection Dye
Squirt a small amount of dye near suspected joints — pump lid, valve stems, unions, skimmer throat, return fittings. If the dye gets sucked in, you’ve found a suction-side leak. If it blows outward, it’s pressurized. This is the cheapest, most reliable leak detection for pools a homeowner can do.
4. Pressure Test the Lines (Advanced DIY)
For stubborn underground pool plumbing leaks, professionals cap the line and pressurize it with air or water to ~15–25 PSI. If the gauge drops over 15–30 minutes, the leak is in that run.
⚠️ Never exceed the manufacturer’s rated pressure. Over-pressurizing a PVC line can blow fittings apart and cause injury. If you don’t own a pressure test kit or aren’t confident, this is the point to hand off to a pro.
5. Inspect Pump and Filter Internals
- Remove the pump lid. Check the basket for cracks and the lid O-ring for flat spots or brittleness.
- For cartridge filters, open the tank and check the clamp O-ring and top seal.
- For sand filters, look for hairline cracks along the tank seam and any sand in the pool (a sign of broken laterals, not the leak itself, but related).
- For DE filters, inspect manifold fingers and the backwash valve seats.
6. Check for Seasonal or Intermittent Leaks
Freeze-thaw cycles, thermal expansion on hot pump runs, and UV-degraded unions can produce leaks that appear only in summer or only on the first cold morning of the season. Track the pattern — it usually points you to the failing part.
Common Leak Locations and How to Fix Them
Here are the usual suspects, in order of frequency.
Pump Lid O-Ring
Symptoms: Air in the pump basket, loss of prime, hissing at the lid.
Fix: Remove the lid, pull the old O-ring out of its groove, clean the groove with a soft cloth, and coat the new ring with silicone pool lube. Hand-tighten the lid — never use a wrench. Cost: $8–$20 DIY.
Pump Shaft Seal
Symptoms: Water dripping between the motor and the wet end; wet motor base.
Fix: Drain the pump, remove the diffuser and impeller (a strap wrench helps), and swap the mechanical seal. Reassembly is the reverse. If the motor got soaked and trips the breaker, replace the whole pump. [link: Pool Pump Replacement Guide]
Difficulty: Moderate. Budget $25–$60 for parts, or $150–$400 for pro labor.
PVC Unions and Threaded Fittings
Symptoms: Drip at a union or a threaded male adapter.
Fix: Hand-tighten the union; if it still weeps, replace the union O-ring. For threaded fittings, drain the line, unscrew, re-wrap with fresh Teflon tape plus a bead of pool-grade thread sealant, and re-torque. For cracked PVC, cut the section out with a hacksaw and re-glue with primer and cement. A PVC union leak is usually a 20-minute fix.
Multiport Valve and Valve Stems
Symptoms: Water weeping from the waste port while filtering, stiff handle, leaks at the stem.
Fix: Open the valve, replace the spider gasket and stem O-rings, lubricate, and reassemble. Cracked valve bodies must be replaced. Cost: $40–$150 parts.
Filter Tank and Clamp
Symptoms: Water spraying from the filter seam or weeping under the clamp band.
Fix: Release pressure, retighten the clamp evenly. If the tank O-ring is flat or cracked, replace it. A pool filter leak from a cracked tank shell is a replacement — tanks are not safely patchable. [link: Pool Filter Types Explained]
Skimmer and Return Fittings
Symptoms: Water level dropping to the skimmer mouth, air bubbles in returns, wet soil near the skimmer.
Fix: Inspect the skimmer weir and throat gasket. For a skimmer leak repair, you may need to chip out the deck-to-skimmer seal and re-grout, or replace the skimmer body entirely — work that can overlap with structural pool repair.
Underground Plumbing
Symptoms: Soggy lawn far from the equipment pad, unexplained sinkholes, persistent water loss after equipment-side leaks are ruled out.
Fix: This is where pool leak detection cost ($200–$600 diagnostic) pays for itself. Professionals use electronic listening equipment, hydrophones, and hydrostatic testing to pinpoint the leak without guessing where to dig. Excavation and repair add $500–$3,000+ depending on depth, decking, and distance. [link: Weekly Pool Maintenance Checklist]
Temporary Fixes
Small hairline cracks in PVC can be sealed with two-part epoxy or pool-grade silicone. A leaky union can be clamped with a repair coupler as a stopgap. These patches are fine for a weekend or end-of-season holdover, but they are not permanent pool leak repair — plan the real fix within a few weeks.
Temporary Fixes vs. Permanent Repairs
| Situation | Temporary patch OK? | Why |
|---|---|---|
| Small PVC crack mid-summer | ✅ Yes | Buy time to schedule pro |
| Failed pump shaft seal | ❌ No | Water kills motor windings fast |
| Cracked filter tank | ❌ No | Can fail explosively under pressure |
| Weeping union O-ring | ✅ Short-term | Lub + re-torque usually holds |
| Skimmer-to-deck separation | ✅ Yes | Sealant holds until off-season rework |
Rule of thumb: if the failure involves pressure-containing plastic or a motor housing, patch it only long enough to source a proper replacement. If it’s a gasket or a small drip, a temporary fix is perfectly fine — just log it and do the real repair before peak swim season.
When to Call a Professional (and What It Will Cost)
Call a licensed pool pro if:
- The leak is in underground plumbing or under the pool deck.
- A DIY repair has failed twice.
- The pump motor is damaged or you’re uncomfortable working with 240V circuits.
- The filter tank is cracked and needs replacement.
- You’ve isolated the leak but lack the specialty tools (pressure tester, hydrophone).
Typical US Cost Ranges (2025–2026)
| Repair | DIY Cost | Pro Cost |
|---|---|---|
| Pump lid O-ring | $8–$20 | $75–$125 (service call) |
| Pump lid or gasket | $30–$80 | $150–$200 |
| Pump shaft seal replacement | $25–$60 | $150–$400 |
| Full pump replacement | $400–$900 | $600–$1,200+ |
| Filter tank replacement | $400–$1,100 | $600–$1,500+ |
| Underground leak location + repair | N/A | $700–$3,000+ |
Prices vary by region, pool size, and accessibility. Get at least three quotes, confirm the company is licensed and insured, and check reviews that specifically mention pool leak repair — not just general service. [link: How to Winterize Your Pool]
Preventive Maintenance to Avoid Future Leaks
A few habits keep the equipment pad dry for years:
- Monthly walk-around. On the first of each month, check every fitting for drips, crusting, or damp soil.
- Annual O-ring refresh. Replace the pump lid O-ring, filter clamp O-ring, and valve stem O-rings each spring. Lubricate with silicone pool lube — never petroleum jelly, which swells rubber.
- Hand-tighten unions. Tool-tightened unions crack under summer heat.
- Seasonal bucket test. Do it at opening and before closing to catch small leaks before they become big ones.
- Keep vegetation back. Trim plants 18+ inches from the pad — roots destroy PVC, and hidden drip lines mask leaks.
- Proper winterization. Blow out lines, add antifreeze, and cover unions to prevent freeze cracks. [link: How to Winterize Your Pool]
These pool maintenance tips cost almost nothing and prevent the majority of emergency leaks.
Conclusion
A pool filtration system leak rarely announces itself dramatically — it whispers through wet soil, rising chemical bills, and a pump that seems to be working harder than it used to. Catch it early, and most repairs are under an hour with basic hand tools. Let it linger, and you’re looking at motor burnout, structural damage, or a surprise excavation bill.
Start with the bucket test, walk the pad with leak detection dye, fix the easy O-rings and unions yourself, and bring in a pro for anything pressurized, underground, or electrically complex. A little DIY pool repair confidence goes a long way — but knowing when to call a pool professional goes further.