There’s nothing quite like stepping out on a warm afternoon to find your pool sparkling with crystal clear pool water. But behind that pristine surface lies an unsung hero working around the clock: your pool’s cartridge filter. If you’ve been putting off maintenance or you’re not sure where to start, you’re not alone. Thousands of US homeowners ask the same question every swimming season: how do I properly clean a cartridge filter without damaging it?
A pool cartridge filter is one of the most popular filtration systems in American backyards — and for good reason. They’re energy-efficient, easy to maintain, and deliver outstanding water clarity when cared for correctly. But neglect? That leads to cloudy water, strained pump motors, and expensive replacements ahead of schedule.
In this comprehensive guide, I’m going to walk you through the entire process of cartridge filter cleaning from start to finish. We’ll cover when to clean, what tools you need, the exact steps to follow, mistakes to avoid, seasonal storage tips, and answers to the most frequently asked questions. Whether you’re a first-time pool owner or a seasoned maintenance pro, this step-by-step cartridge filter cleaning guide has something valuable for you.
What Is a Cartridge Filter and How Does It Work?
Understanding the Basics of a Cartridge Filter
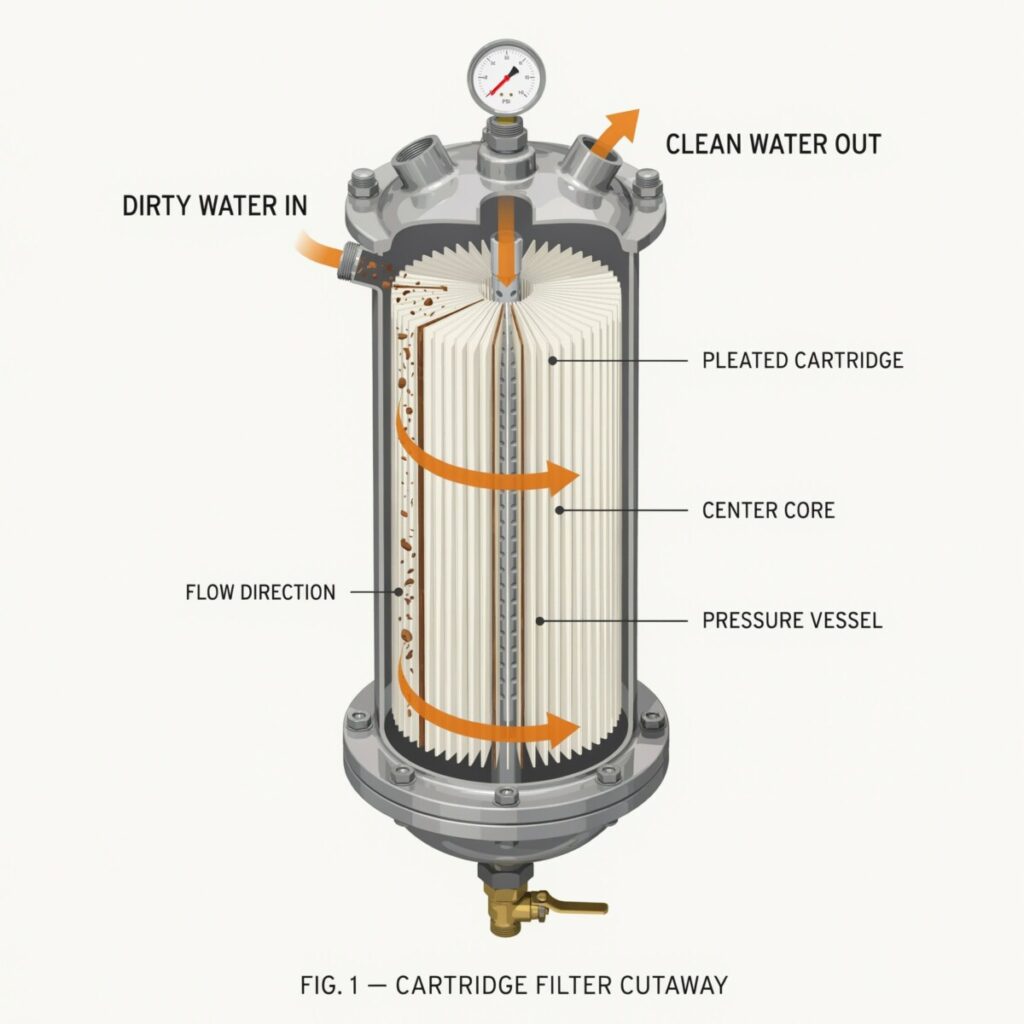
A cartridge filter is a type of pool filtration system that uses a pleated fabric cartridge — typically made from polyester or a polyester-blend material — to trap dirt, debris, algae spores, and microscopic contaminants as pool water circulates through it. Unlike sand filters or DE (diatomaceous earth) filters, cartridge filters don’t require backwashing. Instead, you simply remove the cartridge, rinse it off, and put it back. Simple, right?
The filtration surface area of a typical residential cartridge filter ranges from 100 to 500 square feet of pleated media. Those pleats are the secret: they dramatically increase the surface area available for trapping particles, which is why cartridge filters can capture contaminants as small as 10 to 15 microns — that’s finer than most sand filters manage.
How Pool Water Moves Through the System
Here’s how it works in practice: Your pool pump draws water from the skimmer and main drain, pushes it into the pool filter tank, and forces it through the outside of the cartridge pleats toward the hollow core inside. Clean water exits through the core and returns to your pool. As debris accumulates on the outer surface of the pleats, flow resistance increases — which is your first signal that it’s time to clean a cartridge filter.
When to Clean Your Cartridge Filter: Reading the Signs
Watch Your Pressure Gauge Closely
One of the most reliable indicators that it’s time for pool filter maintenance is your filter’s pressure gauge. Here’s the golden rule: when your filter pressure increases 5 to 10 PSI above its normal, clean starting pressure, it’s time to clean. For example, if your filter typically runs at 15 PSI when freshly cleaned, you should schedule a cleaning once the gauge reads 20 to 25 PSI.
This filter pressure increase 5-10 PSI rule is cited by major pool equipment manufacturers and is the single most actionable tip you can follow. I recommend noting your “clean pressure” on a piece of tape stuck right on the gauge — that way, you always have a quick visual reference.
Other Dirty Cartridge Filter Signs
Beyond the pressure gauge, watch for these dirty cartridge filter signs:
- Cloudy or hazy pool water that doesn’t clear up after shocking
- Reduced water flow from your return jets
- The pump sounds like it’s working harder or making unusual strain noises
- Shorter run times between cleanings than usual (may indicate the cartridge is wearing out)
- Visible algae growth returning quickly after treatment
Recommended Cartridge Filter Maintenance Schedule
As a general cartridge filter maintenance schedule guideline for US pool owners:
| Season | Suggested Cleaning Frequency |
|---|---|
| Peak Summer (heavy use) | Every 2–4 weeks |
| Spring/Fall (moderate use) | Every 4–6 weeks |
| Winter (pool closed) | Once before closing, inspect before reopening |
Keep in mind that pools surrounded by trees, located in dusty areas, or experiencing heavy bather loads will need more frequent cleaning. Always let the pressure gauge be your primary guide rather than the calendar.
Tools and Materials You’ll Need
Before you dive into the actual cleaning process, gather your supplies. Having everything ready makes the job faster and more effective. Here’s what I keep on hand for every cartridge filter cleaning session:
Essential Tools
- Garden hose for filter cleaning — A standard hose with a spray nozzle works perfectly. You do NOT need high-pressure equipment (more on this below).
- Filter cleaning solution — For deep cleanings, a dedicated cartridge filter cleaner (available at any pool supply store) breaks down oils, minerals, and organic buildup that rinsing alone can’t remove.
- Large bucket or tub — Big enough to submerge your cartridge for soaking.
- Soft-bristle brush — Useful for gently loosening stubborn debris between pleats.
- O-ring lubricant — Silicone-based pool lubricant for the filter tank O-ring to ensure a proper seal on reassembly.
Optional but Helpful
- Cartridge filter cleaning wand — A specialized attachment that fits between pleats for thorough rinsing
- Rubber gloves — For handling cleaning chemicals
- Pressure gauge replacement — Good to have in case yours is inaccurate or broken
- Spare cartridge — Allows you to rotate between a clean and dirty cartridge, giving soaked cartridges time to fully dry
Total cost for basic supplies runs around $15–$40, which is a small investment compared to the cost of premature filter replacement or professional service calls.
How to Clean a Cartridge Filter: Step-by-Step Process
Now let’s get into the heart of this guide. Follow these steps carefully, and your filter will be running like new in about 30–60 minutes (plus any soaking time).
Step 1: Turn Off the Pool Pump and Release Pressure
Safety first. Head to your pool equipment pad and turn off the pump at the breaker or control panel. Never open a filter tank while the system is pressurized — it can be dangerous.
Once the pump is off, locate the air relief valve on top of your filter tank and slowly open it. You’ll hear a hiss as trapped air and pressure escape. Wait until the hissing stops completely before proceeding.
Step 2: Open the Filter Tank and Remove the Cartridge
Depending on your filter model, you’ll either unscrew a locking ring, release clamp bands, or unbolt the tank lid. Consult your owner’s manual if you’re unsure — different brands (Hayward, Pentair, Jandy) have slightly different mechanisms.
Carefully lift the cartridge straight out of the pool filter tank. It will be heavy and dripping with dirty water, so have a bucket or tarp ready underneath. Take a moment to inspect the cartridge before moving on.
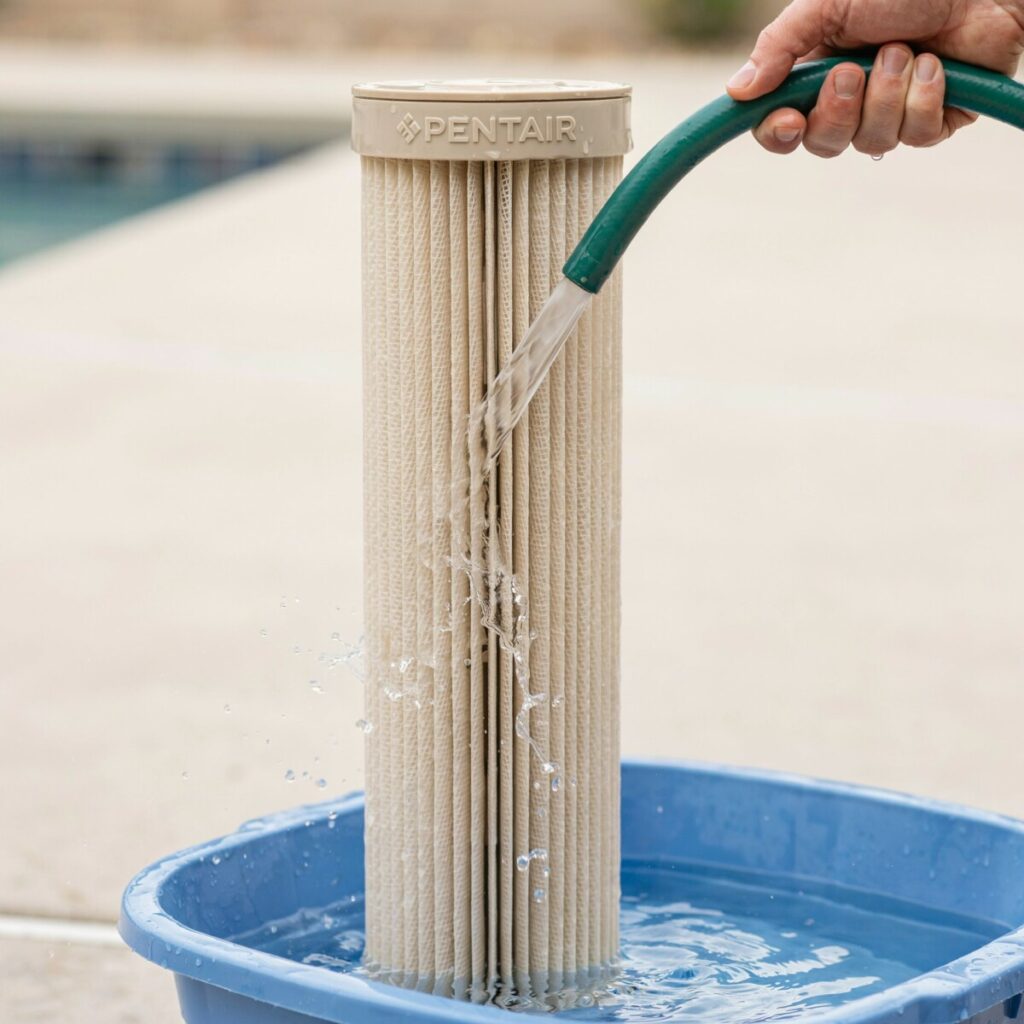
Step 3: Initial Rinse with a Garden Hose
This is the most important step for routine cleanings. Using your garden hose for filter cleaning, spray the cartridge from top to bottom, working at a 45-degree angle to push debris out of the pleats rather than embedding it deeper.
Key technique tips:
- Start at the top and work down systematically
- Spray between every pleat — don’t just hit the outer surface
- Rotate the cartridge slowly as you work around the circumference
- Spend extra time on the top and bottom end caps where debris collects
- Rinse until the water running off the cartridge appears clear
Step 4: Deep Soak in Filter Cleaning Solution (Monthly or as Needed)
For routine maintenance, rinsing is enough. But every 4–6 weeks — or whenever the cartridge looks heavily soiled even after rinsing — give it a chemical soak.
- Fill a large bucket or tub with warm water
- Add the recommended amount of filter cleaning solution (follow the product label)
- Submerge the cartridge completely
- Let it soak for at least 6 hours, or overnight for best results
- Remove and rinse thoroughly with the garden hose afterward
This soaking process breaks down body oils, sunscreen residue, calcium deposits, and organic contaminants that plain water can’t dissolve.
Step 5: Inspect the Cartridge for Damage
With the cartridge clean, it’s the perfect time to inspect it. Look for:
- Torn or frayed pleats — Even small tears let unfiltered water pass through
- Cracked end caps — Compromises the structural integrity
- Damaged or missing gaskets — Can cause bypass leakage inside the tank
- Persistent staining or discoloration — May indicate the cartridge has reached end-of-life even if physically intact
A well-maintained cartridge typically lasts 2–4 years before replacement is needed. If you spot significant damage, it’s time for a new one — don’t try to patch a torn cartridge with silicone or tape, as this won’t hold under operating pressure.
Step 6: Lubricate the O-Ring and Reinstall
Before putting everything back together:
- Remove the tank O-ring and inspect it for cracks, flat spots, or brittleness
- Clean the O-ring with a damp cloth
- Apply a thin coat of O-ring lubricant (silicone-based, pool-safe) around the entire ring — never use petroleum jelly as it degrades rubber
- Re-seat the O-ring in its groove
- Place the clean cartridge back into the filter tank, making sure it’s properly aligned and seated on the standpipe
- Close the tank lid and secure the locking ring or clamp bands tightly
Step 7: Restart the System and Check for Leaks
Turn the pump back on and immediately open the air relief valve. As water fills the filter tank, air will escape through the valve. Once you see a steady stream of water (no more air bubbles), close the valve.
Check around the tank seam and all connections for leaks. Watch the pressure gauge — it should read at or near your “clean” baseline pressure. If everything looks good, congratulations — you’ve successfully completed the step-by-step cartridge filter cleaning process!
Common Mistakes to Avoid During Cartridge Filter Cleaning
Even experienced pool owners make avoidable errors. Here are the biggest pitfalls I’ve seen — and how to prevent them:
❌ Using a Pressure Washer
This is the number one mistake people make. The intense pressure from a power washer will shred the delicate pleated fabric of your cartridge, creating microscopic tears that allow dirt and debris to pass right through. Always do not use pressure washer on filter cartridges. A standard garden hose with a spray nozzle provides more than enough force. Cartridge filter damage prevention starts with using gentle water pressure.
❌ Skipping the O-Ring Lubrication
A dry O-ring can pinch, crack, or fail to seal properly when you reassemble the tank. This leads to leaks and potential flooding around your equipment pad. Always lubricate.
❌ Reassembling Without Releasing Pressure First
Opening a pressurized filter tank can cause the lid to blow off with significant force, causing injury or equipment damage. Always relieve pressure via the air valve first.
❌ Letting the Cartridge Dry Before Rinsing
If your filter has been sitting out and the debris has dried and hardened onto the pleats, it becomes much harder to remove. Soak in water first to rehydrate the debris before attempting to rinse.
❌ Not Tracking Your Clean Pressure
Without a baseline “clean PSI” reading recorded, you can’t accurately determine when cleaning is needed. That filter pressure increase 5-10 PSI rule only works if you know your starting point.
Winterizing and Storing Your Cartridge Filter
How to Winterize a Cartridge Filter
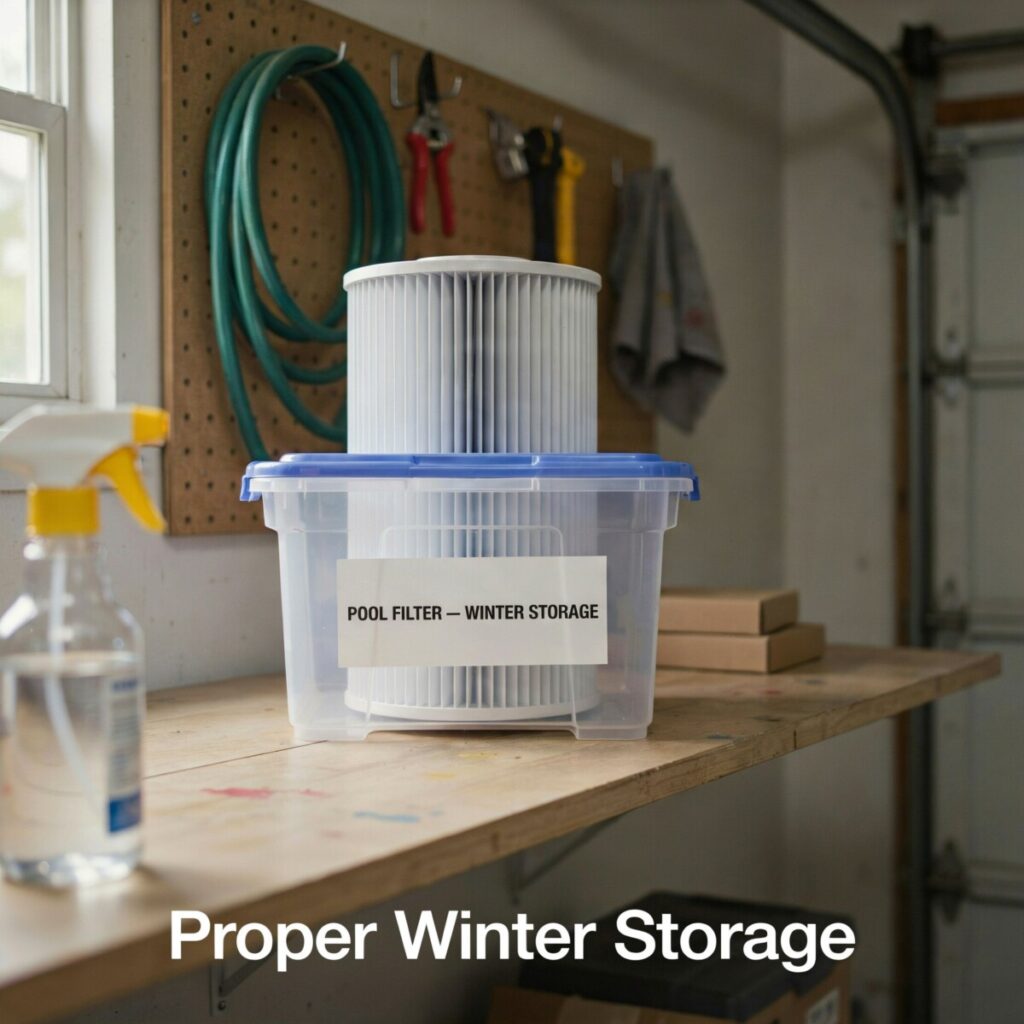
If you live in a climate with freezing winters and close your pool for the season, proper storage of your cartridge is essential.
- Remove the cartridge from the filter tank after your last swim
- Rinse and deep-clean it using the steps above — never store a dirty cartridge
- Allow it to dry completely in a shaded, well-ventilated area (direct sunlight can degrade the fabric over time)
- Store pool filter cartridge in a climate-controlled filter storage area — a garage, basement, or utility room is ideal
- Store the cartridge upright in a plastic bin or the original box to protect it from physical damage and pests
Protecting the Filter Tank Itself
Don’t forget about the tank housing. Drain any remaining water from the filter tank body to prevent freeze damage. Leave the drain plug open and the air relief valve cracked to allow ventilation throughout the winter months.
Maintenance Frequency and Long-Term Care for Efficient Pool Filtration
Efficient pool filtration isn’t just about cleaning — it’s about adopting a holistic approach to pool water care. Here are my top long-term tips to extend filter life and keep your system running at peak performance:
Balance Your Pool Chemistry
Unbalanced water chemistry — particularly high calcium hardness or low pH — can cause mineral scaling on your cartridge pleats. This scaling reduces the filter’s effective surface area and forces more frequent cleanings. Keep your water balanced within recommended ranges (pH 7.2–7.6, calcium hardness 200–400 ppm).
Keep Your Pool Skimmer Baskets Clean
The less large debris that reaches your filter, the longer your cartridge lasts. Empty skimmer baskets weekly and keep nearby trees trimmed where possible.
Consider a Pre-Filter or Filter Sock
For pools with heavy debris loads, a filter sock or pre-filter screen catches large particles before they reach the cartridge, dramatically extending time between cleanings and extending filter life.
Rotate Between Two Cartridges
Buying a second cartridge and rotating them means you always have a clean, dry cartridge ready to install while the dirty one soaks and dries. This reduces wear and extends the life of both cartridges.
Replace Cartridges on Schedule
Even with perfect care, cartridge media degrades over time. Plan to replace your cartridge every 2–4 years depending on use intensity. A cartridge that’s been in service too long will allow particles to pass through even when freshly cleaned, defeating the purpose of pool filter maintenance.
Quick Takeaways
Here are the most important points from this guide:
- ✅ Clean when pressure rises 5–10 PSI above your normal clean starting pressure
- ✅ Always use a garden hose, never a pressure washer, to prevent damage to the pleats
- ✅ Spray from top to bottom at a 45-degree angle to flush debris out of the pleats
- ✅ Deep soak monthly with a dedicated filter cleaning solution for best results
- ✅ Lubricate the O-ring with silicone-based pool lubricant every time you reassemble
- ✅ Inspect for tears and cracks each time you remove the cartridge — replace if damaged
- ✅ Store cartridges dry and indoors during winter to prevent freeze damage and degradation
Frequently Asked Questions (FAQs)
1. How often should I clean my cartridge filter?
For most US homeowners, when to clean pool filter cartridges depends on usage and environment. During peak swimming season, plan to clean every 2–4 weeks. In shoulder seasons (spring/fall), every 4–6 weeks is usually sufficient. The most reliable method is monitoring your pressure gauge — clean when you see a 5–10 PSI increase over your baseline.
2. Can I use a pressure washer to clean a cartridge filter?
Absolutely not. Using a pressure washer is one of the most common causes of cartridge filter damage prevention failures. The high-pressure stream will tear the delicate pleated fabric and create holes that allow contaminants to pass through. Always stick with a standard garden hose for filter cleaning with a spray nozzle.
3. What PSI indicates my filter needs cleaning?
Every filter system has a different normal operating pressure, but the rule is universal: if you experience high pool filter pressure that’s 5 to 10 PSI above your clean, starting pressure, it’s time to clean. For example, if your filter starts at 12 PSI when clean, schedule maintenance at 17–22 PSI.
4. How do I store my cartridge filter in winter?
To properly winterize cartridge filter systems, remove the cartridge, deep-clean it, allow it to dry completely, and store it upright in a climate-controlled filter storage area such as a garage or basement. Drain the filter tank body and leave valves open for ventilation to prevent freeze damage.
5. Can I reuse an old cartridge filter if it’s torn?
No. A torn or damaged cartridge cannot effectively clean pool filter cartridge debris from your water and will allow unfiltered particles to circulate in your pool. Even small tears compromise the entire system’s effectiveness. Replace damaged cartridges immediately to maintain crystal clear pool water and protect your swimmers’ health.
Conclusion: Your Pool Deserves Consistent Care
Learning how to clean a cartridge filter properly is one of the most impactful things you can do for your pool’s health, clarity, and longevity. It’s not glamorous work, but 30 minutes of maintenance every few weeks saves you hundreds of dollars in equipment repairs, chemical overuse, and premature replacements.
Let’s recap the essentials one more time: monitor your pressure gauge religiously, rinse with a garden hose at the correct angle, soak monthly with a dedicated cleaner, inspect for damage, lubricate your O-ring, and store properly during the off-season. Follow these practices consistently, and your cartridge filter will deliver efficient pool filtration and beautiful water season after season.
Your pool is an investment — in your home, your family’s enjoyment, and your quality of life. Taking care of the equipment that keeps it running smoothly is always time well spent.
📌 Share this guide with fellow pool owners who might benefit from it, and bookmark this page for your next pool maintenance day. Clean water starts with a clean filter!
References
- Leslie’s Pool Supplies – “Cartridge Filter Maintenance Guide.” lesliespool.com — Industry-leading pool supply retailer with manufacturer-backed maintenance guidelines.
- Hayward Pool Products – “Cartridge Filter Owner’s Manual and Maintenance Best Practices.” hayward.com — Official technical documentation from a leading US filter manufacturer.
- Allied Outdoor Pools – “How to Maintain Your Pool Cartridge Filter Like a Pro.” alliedoutdoorpools.com — Service-focused guidance from experienced pool technicians.
- Hurricane Pool Filters – “Cartridge Filter Care, Cleaning, and Replacement Guide.” hurricanepoolfilters.com — Specialized filter retailer with detailed care instructions.
- Pentair Aquatic Systems – “Clean & Clear Cartridge Filter Installation and Operation Manual.” pentair.com — OEM maintenance recommendations and pressure specifications.