If you own a residential pool in the US, there’s a good chance a sand filter is doing the heavy lifting to keep your water clear. Sand filters are durable, relatively low-maintenance, and cost-effective—but they do require one critical routine task: backwashing.
Backwashing a sand filter is the process of reversing water flow through the filter tank to flush out trapped dirt, debris, and contaminants. Skip it, and your filter’s pressure climbs, your water turns cloudy, and your pump works harder (and costs you more in electricity). Do it correctly, and your sand filter can serve you reliably for years.
By the end of this guide, you’ll know exactly when to backwash, how to backwash a sand filter step by step, and the maintenance tips that prolong your filter’s life. Let’s dive in.
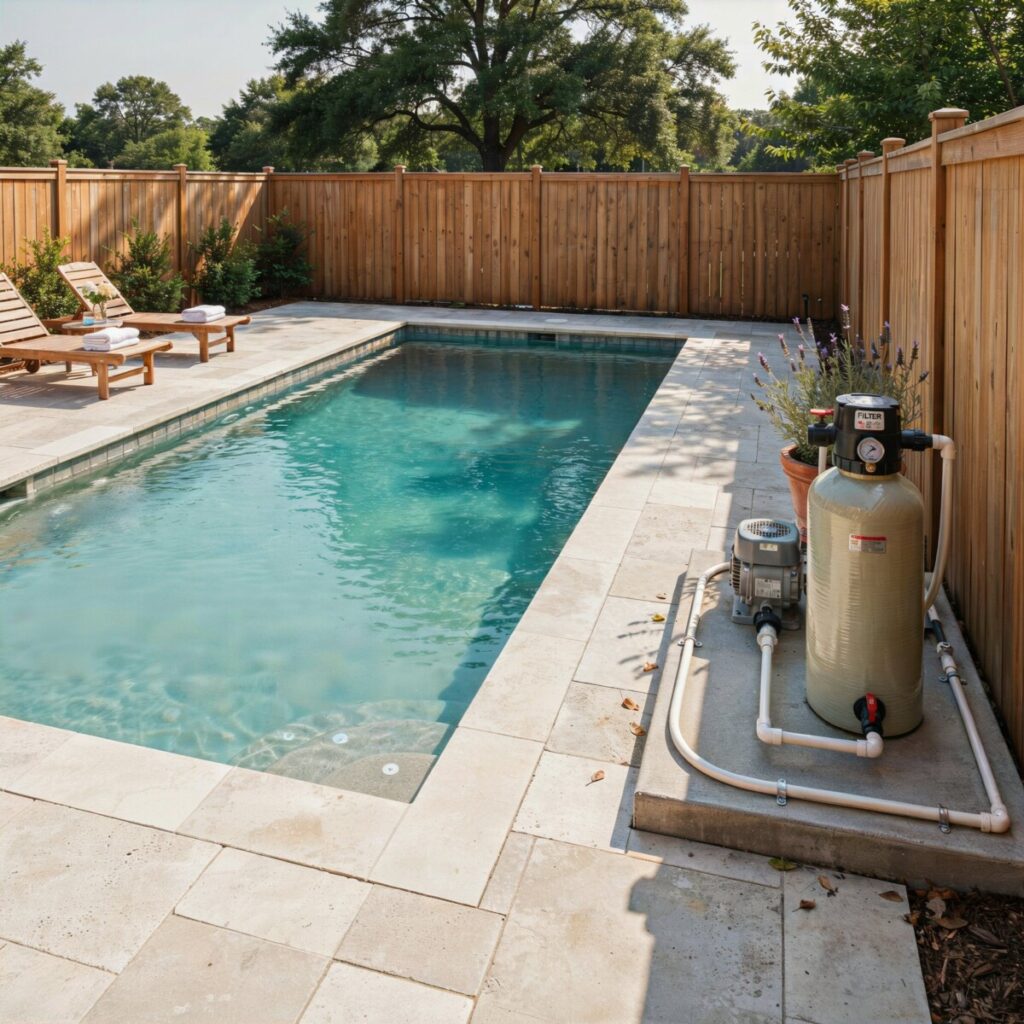
What Is a Sand Filter and How Does It Work?
A sand filter is a large tank—usually fiberglass, stainless steel, or molded plastic—filled with a specific grade of pool filter sand (typically #20 silica sand, with grain sizes of 0.45–0.55 mm). Here’s the basic mechanics:
- Normal filtration (FILTER mode): Pool water is pumped into the top of the tank and forced downward through the sand bed. The sand grains trap particles as small as 20–40 microns (dust, pollen, algae fragments, sunscreen residue). Clean water exits through laterals at the bottom and returns to the pool.
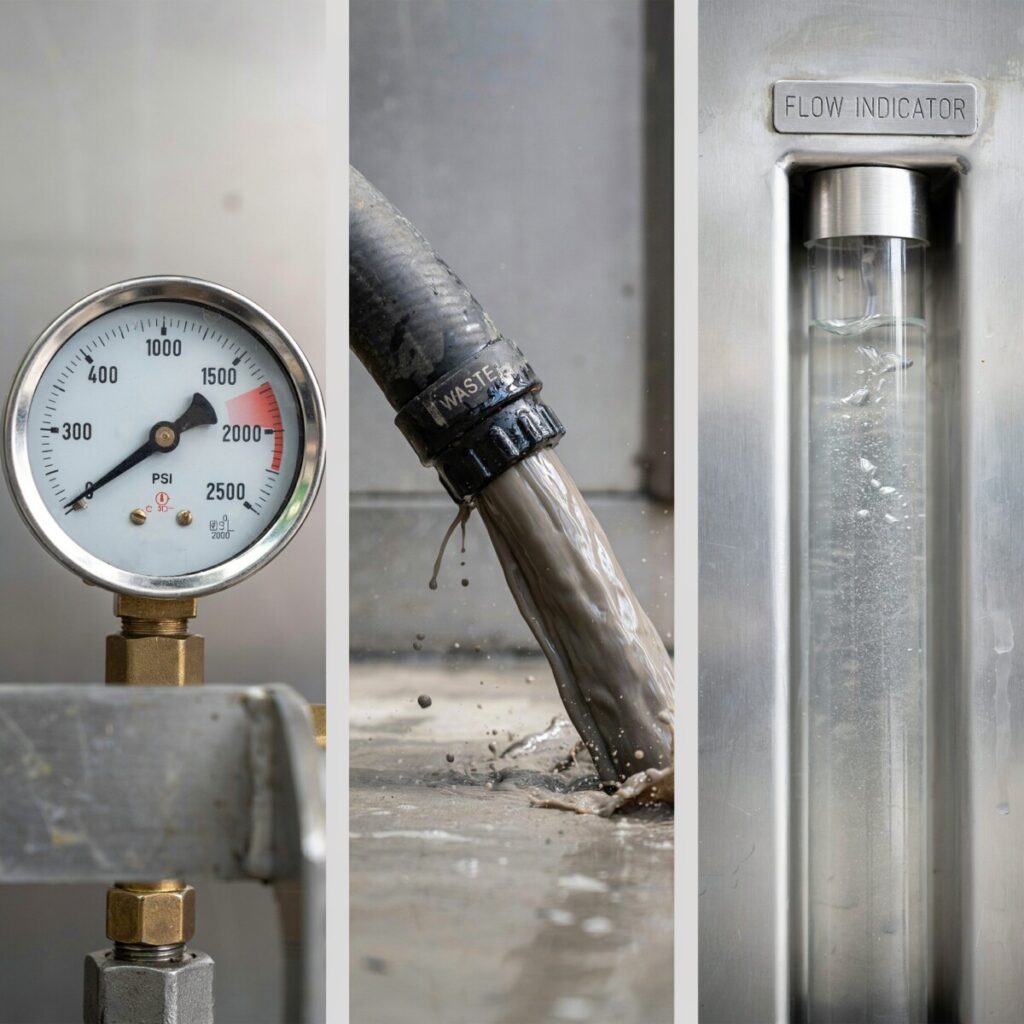
- Pressure as a signal: As the sand bed fills with debris, resistance increases. You’ll see this reflected on your filter’s pressure gauge—a clean sand filter typically reads between 8–15 psi at startup, depending on the model and plumbing.
- When flow reverses (BACKWASH mode): Water is pumped into the bottom of the tank and forced upward, “lifting” and agitating the sand bed so trapped contaminants flush out through the waste line.
Sand vs. DE vs. Cartridge Filters
| Filter Type | Filtration Level | Backwashing? | Typical Maintenance |
|---|---|---|---|
| Sand | 20–40 microns | Yes, routine | Sand replacement every 3–7 years |
| DE (Diatomaceous Earth) | 2–5 microns | Yes, plus DE recharge | More involved, finer filtration |
| Cartridge | 10–20 microns | No (hosed off or replaced) | Cartridge swap every 1–3 years |
Sand filters hit a sweet spot for most US homeowners: easy to backwash, affordable to maintain, and forgiving of occasional neglect.
Why Backwashing Is Important
Neglecting backwashing has a cascading effect on your entire pool system:
- Pressure build-up: A clogged sand bed forces the pump to work against higher resistance. High pressure strains seals, gaskets, and the pump motor itself.
- Reduced flow and circulation: Less water moving through the system means skimmers and returns underperform—dead zones form where algae loves to grow.
- Cloudy or green water: When the sand is saturated, particles pass right through. You’ll spot dull, hazy water no amount of chlorine can fix.
- Bacterial and algae risk: Stagnant debris in a packed sand bed becomes a breeding ground for microbes.
- Higher energy bills: A pump fighting a dirty filter draws more amps for longer run times.
- Sand compaction and channeling: Over time, unmaintained sand compresses and forms “channels”—narrow paths where water takes the easy route, bypassing most of the sand bed entirely. Once channeling sets in, backwashing alone won’t restore performance.
Bottom line: Backwashing is the single most important maintenance task for a sand filter. It’s quick, it’s free (aside from water), and it prevents expensive repairs.
How Often to Backwash a Sand Filter
There’s no one-size-fits-all calendar schedule. Instead, rely on these signals:
The Pressure Gauge Rule (the gold standard)
Note your filter’s clean starting pressure right after a fresh backwash. Backwash again when the gauge rises 8–10 psi above that baseline. For example, if your filter starts at 12 psi when clean and climbs to 20–22 psi during a hot July week, it’s time to backwash.
Other Visual and Seasonal Triggers
- Cloudy water despite balanced chemistry
- Heavy bather load (pool parties, kids’ swim camps)
- After vacuuming a very dirty pool
- After major storms or pollen events
- Post-algae treatment (dead algae clogs sand quickly)
Seasonal Patterns in the US
- Summer (peak swim season): Backwashing every 1–2 weeks is common, especially in Sun Belt states like Florida, Texas, and Arizona.
- Fall: Leaf drop in the Northeast and Midwest often means more frequent backwashes.
- Winter (closed pools): No backwashing needed, but backwash before closing and after opening.
For many average US residential pools, a rough frequency of every 2–4 weeks during the swim season is typical—but always defer to your pressure gauge.
Tools, Supplies, and Safety Checklist
Before you begin, gather these items:
- ✅ Your pool’s multiport valve (most sand filters have a 6- or 7-position valve: FILTER, BACKWASH, RINSE, WASTE, RECIRCULATE, CLOSED, WINTER)
- ✅ A backwash hose routed to an approved drainage area (or hard-plumbed waste line)
- ✅ Water source to top off the pool after backwashing
- ✅ Pressure gauge (confirm it’s working—tap it lightly; if the needle is stuck, replace it)
- ✅ Gloves and safety glasses (optional but recommended)
- ✅ A towel or rag for minor drips
- ✅ Test kit or strips for post-backwash chemical checks
⚠️ Safety Rules (Non-Negotiable)
- Never change the multiport valve position while the pump is running. This can crack the valve’s spider gasket or internal seals.
- Always turn the pump OFF before moving the handle.
- Never backwash into a storm drain in most US municipalities—this is typically prohibited and can result in fines.
- Lock out/tag out: If children are nearby, make sure the equipment pad is secure during maintenance.
Step-by-Step: How to Backwash a Sand Filter
Follow these steps carefully. Total active time: about 5–10 minutes.
Pre-Steps (Before You Touch Anything)
- Turn off the pool pump at the breaker or control panel.
- Note the current pressure on the filter gauge (this is your “before” reading).
- Unroll or connect the backwash hose and route it to your approved drainage point—a landscaped area, sanitary sewer cleanout (where local code allows), or dry well.
- Relieve pressure by briefly opening the air relief valve on top of the filter (if equipped).
Step 1: Set Valve to BACKWASH and Run
- With the pump off, press down on the multiport valve handle and rotate it firmly to the BACKWASH position.
- Turn the pump on.
- If your filter has a sight glass on the waste line, watch it—the water will start out dark, brownish, or cloudy.
- Let the pump run in BACKWASH until the sight glass (or the water exiting your waste hose) runs clear. This typically takes 1–3 minutes for a residential filter. Heavily loaded filters may take up to 5 minutes.
Pro tip: If you don’t have a sight glass, hold a white bucket under the waste line outflow. When the water looks clean against the white background, you’re done.
Step 2: Turn Pump Off, Set Valve to RINSE
This step is critical and often skipped—don’t skip it.
- Turn the pump off.
- Move the multiport valve to RINSE.
- Turn the pump back on and run for 20–30 seconds (or until the sight glass clears again).
The RINSE cycle resettles the sand bed in the correct layered order and flushes any remaining debris from the laterals and internal piping. Without rinsing, the first few minutes back on FILTER will send a burst of dirty water right back into your pool.
Step 3: Return to FILTER
- Turn the pump off one last time.
- Move the multiport valve back to FILTER.
- Turn the pump on.
- Check the pressure gauge—it should now be back at or near your clean starting pressure (typically 8–10 psi lower than before you started).
Step 4: Top Off and Rebalance
Backwashing removes water from the pool—usually 200–500 gallons per cycle, depending on your filter size and run time. Top off with fresh water, then:
- Test pH, alkalinity, and chlorine (or salt level for saltwater pools).
- Add chlorine, shock, or other chemicals as needed. Backwashing dilutes your sanitizer level.
- Run the pump for at least one full cycle (8–12 hours for most pools) to ensure full circulation.
Variations to Know
- Push-pull valve (slide valve): Common on older filters. Pull the handle up or push it down to switch between FILTER and BACKWASH. These typically lack a RINSE position—run a short FILTER burst after backwashing to resettle the sand.
- Multiport with no sight glass: Rely on timed intervals (2–3 minutes backwash, 30 seconds rinse) and check water clarity via the waste hose outflow.
- Variable-speed pumps: Run the pump at high speed (2,800–3,450 RPM) during backwash to effectively lift the sand bed.
Common Mistakes to Avoid
Even experienced pool owners make these errors. Watch out for:
- ❌ Moving the valve while the pump is running. This cracks the spider gasket—a $5 part that becomes a $300 repair once water bypasses internally.
- ❌ Skipping the RINSE step. Result: a cloud of dirt shoots back into the pool on restart.
- ❌ Backwashing too often. Counterintuitively, a slightly loaded sand bed actually filters better than a brand-new clean one. Backwashing daily wastes hundreds of gallons of water per week and chemically treated water.
- ❌ Forgetting to rebalance chemicals. Dilution from top-off water throws off your carefully balanced chemistry.
- ❌ Discharging to storm drains. In most US jurisdictions, chlorinated backwash water entering storm drains is a code violation—it flows untreated into local waterways.
- ❌ Ignoring an abnormal pressure drop. If pressure drops after backwashing instead of returning to normal baseline, you may have a cracked lateral or a broken standpipe.
Troubleshooting and Signs of Filter Problems
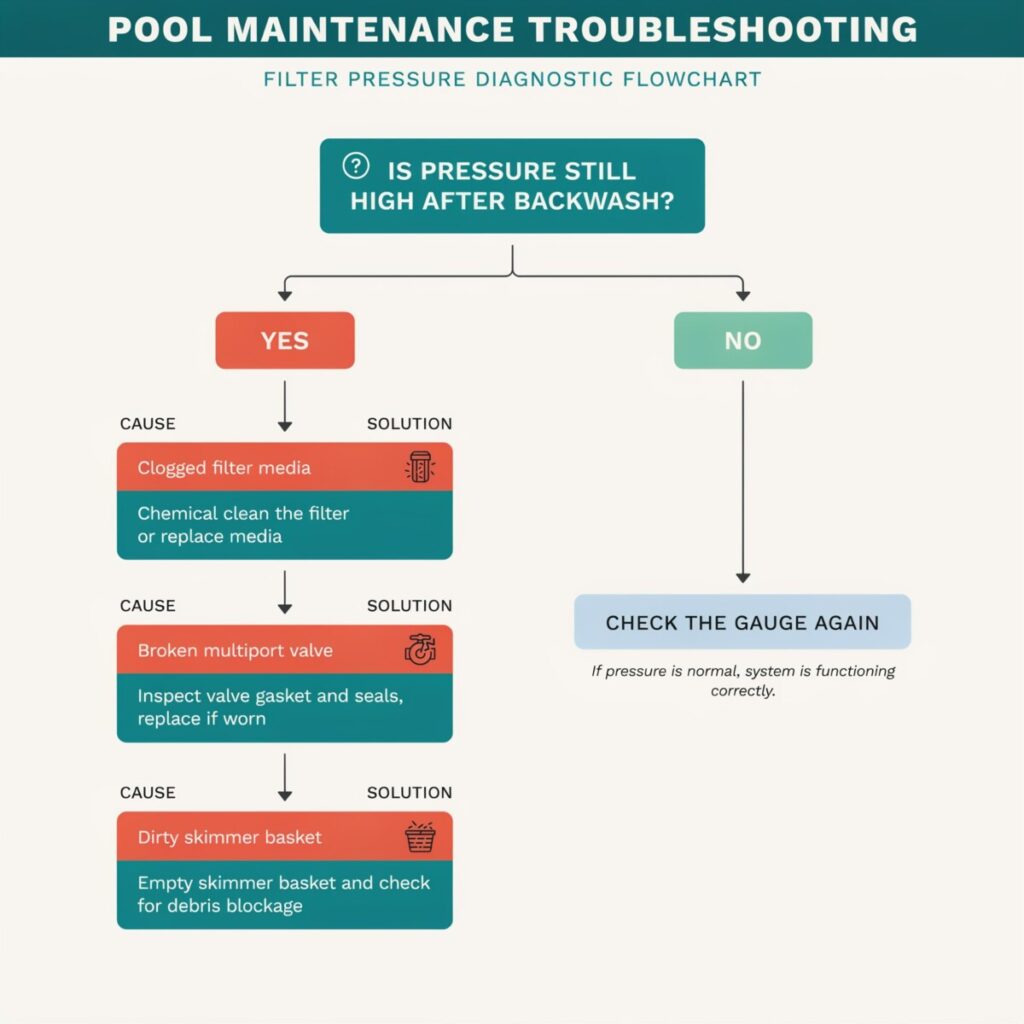
A healthy backwash should drop your pressure 8–10 psi and restore water clarity within hours. If it doesn’t, here’s what might be wrong:
Persistent High Pressure After Backwash
- Caked or channeled sand: The sand bed has hardened and isn’t fluidizing during backwash. Solution: use a sand filter cleaner (like BioGuard Rapid Action Filter Cleaner or a generic equivalent) and perform a deep chemical soak. If that fails, replace the sand.
- Oversized pump: A pump too powerful for the filter can cause high pressure even with clean sand. Have a pro verify proper pump-filter sizing.
- Blocked return line or closed valve downstream: Check that all return valves are fully open.
Sand Blowing Back Into the Pool
- Cracked lateral at the bottom of the filter tank
- Broken standpipe (the center pipe that carries clean water out)
- Wrong sand grain size (too fine—must be #20 pool-grade silica)
This is a “call a pro” situation unless you’re comfortable opening the tank and inspecting internals.
Cloudy Water Persists After Proper Backwash
- The sand may be 5+ years old and worn smooth (rounded grains no longer trap fine particles).
- Chemistry imbalance (high pH, low chlorine, high cyanuric acid).
- A failing pump that isn’t moving enough water through the filter per cycle.
Sand Lifespan
Standard #20 silica sand lasts 3–5 years on average. Glass filter media and ZeoSand can last 5–10+ years but cost more up front. If your filter is more than 5 years old and you’ve tried chemical cleaning with no improvement, it’s time to replace the sand in your filter.
Maintenance Tips to Extend Filter Life
Routine backwashing is step one, but these complementary habits add years to your sand filter:
- Keep a pressure log. A small notebook or spreadsheet tracking “clean” and “dirty” pressures seasonally helps you spot trends and detect issues early.
- Deep-clean the sand annually. Use a filter cleaner chemical soak at the start and end of the swim season. For salt pools, this is especially important—salt crystallizes on sand grains.
- Inspect the multiport valve spider gasket every 2–3 years. A worn gasket causes internal water bypass, leading to “sand” (actually dirt) in the pool and inconsistent filtration.
- Use a skimmer sock or pre-filter on your pump basket to catch hair, lint, and fine debris before it even reaches the filter.
- Winterize properly. Drain the filter tank, set the valve to WINTER (or between positions, not on a detent), and cover the equipment pad.
- Replace pressure gauges every few years—they’re cheap and often the first thing to fail silently.
- Schedule sand replacement proactively on a 5-year calendar, rather than reacting to performance drops.
Cost, Time, and Environmental Considerations
Understanding the real cost of backwashing helps you plan and conserve:
| Factor | Typical US Residential Pool |
|---|---|
| Time per backwash | 5–10 minutes active; 20–30 minutes including top-off and chemical testing |
| Water used per backwash | 200–500 gallons (varies by filter size and run time) |
| Chemical cost to rebalance | $2–$8 per backwash (chlorine, pH adjusters) |
| Sand replacement cost | $25–$40 for a 50-lb bag of #20 silica; $75–$150 for glass media or ZeoSand |
| Professional sand replacement | $200–$450 (labor + materials) |
Environmental and Regulatory Notes (US-Specific)
- Most US municipalities prohibit discharging chlorinated pool water into storm drains. Storm drains lead directly to rivers, lakes, and oceans—untreated.
- Acceptable discharge options include: a sanitary sewer cleanout (check local rules), a dry well, or a landscaped area where chlorine has dissipated (dechlorination by letting water sit for 48+ hours or using sodium thiosulfate).
- Some states (notably California, Arizona, and Nevada, where water is scarce) have specific pool backwash disposal regulations. Always check your city or county code.
- Reduce water waste by using a cartridge pre-filter, skimmer socks, and only vacuuming to waste during algae treatments or heavy debris events.
Conclusion and Quick Backwash Checklist
Backwashing a sand filter is one of the simplest, most impactful maintenance tasks a pool owner can perform. Done correctly and on schedule, it keeps water crystal clear, protects your pump, and extends the life of your filter media. Remember the golden rule: always turn the pump off before moving the valve, and never skip the RINSE step.
✅ Your Every-Time Backwash Checklist
- Check the pressure gauge — is it 8–10 psi above clean baseline?
- Turn the pump OFF.
- Route the waste hose to an approved drainage point.
- Set valve to BACKWASH, turn pump ON, run 1–3 minutes (until clear).
- Turn pump OFF, set to RINSE, run 20–30 seconds.
- Turn pump OFF, set to FILTER, restart pump.
- Top off the pool and verify pressure returned to baseline.
- Test and rebalance pool chemistry.
Pin this checklist to your equipment pad or save it to your phone—you’ll be backwashing like a pro in no time.